Our Course
Erie’s Best Kept Golf Secret
Play at our beautiful Scenic Heights Golf Course
Course Description and Layout
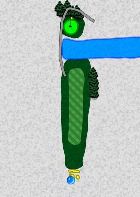
Driving Range
Come on over to the driving range to work on your game or warm up before a round. Located right behind the clubhouse!
Our Course
Our well maintained 18 hole course features four sets of tees (ranging from 5085 yards to 6146 yards) for all skill levels, designed with many unique characteristics to maximize your golf enjoyment.
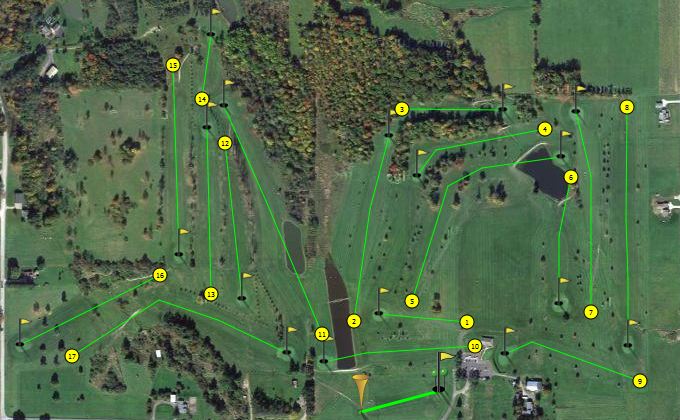
Course Specifications
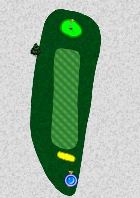
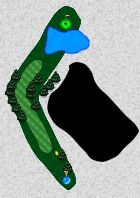
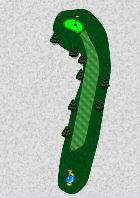
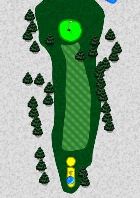
Hole Number 1
Par: 3HCP: 15
Blue: 180White: 170Gold: 160Red: 150
With a green that is sloped from left to right and front to back, it is best to avoid missing left or long that usually requires a more difficult chip shot. Wind often plays a factor on this hole.
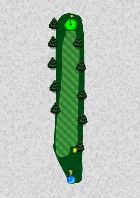
Hole Number 2
Par: 4HCP: 5
Blue: 395White: 385Gold: 230Red: 315
A generous fairway and rough allows for forgiveness off the tee. Avoid tee shots that are too far left (out of bounds) or far enough right that brings trees into play on your approach shot. Trouble lurks just left and right of the green on this approach shot.
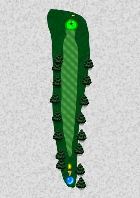
Hole Number 3
Par: 3HCP: 13
Blue: 197White: 158Gold: 135Red: 130
A premium is placed on an approach shot that is left below the flag on this green that is severely sloped from back to front. The green is protected by water in the front and trees on the left and right.

Hole Number 4
Par: 4HCP: 9
Blue: 315White: 302Gold: 270Red: 265
With a narrow fairway that is tree lined on both sides, an accurate tee shot is required to set up a short wedge/iron shot into a green that is best approached from the right side of the fairway. Longer drivers can take the risk/reward of hitting around or over the left trees on the short par 4 hole.

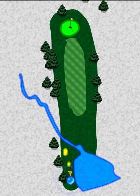
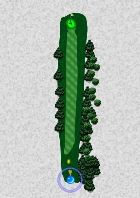
Hole Number 5
Par: 5HCP: 1
Blue: 525White: 515Gold: 401Red: 396
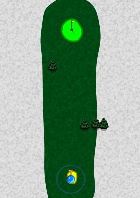
Our number 1 handicap hole requires an approach shot over water into a green that is severely sloped from back to front. A premium is placed on leaving your approach shot below the flag and avoiding an extremely difficult chip if you are long. Long drivers often take the risk/reward of cutting the right corner and avoiding the out of bounds of the parallel driving range. The ideal set up location is at the flat lie area near the hundred yard marker. A ball drop is conveniently located on the other side of the water.
Hole Number 6
Par: 4HCP: 17
Blue: 260White: 250Gold: 209Red: 204
This short par 4 is protected by a two tiered green that is severely sloped from right to left. A properly placed approach shot is necessary depending on the flag position. Avoid missing long or to the right of the green which usually requires a much more difficult chip shot.
Hole Number 7
Par: 4HCP: 7
Blue: 415White: 405Gold: 358Red: 353
The longest par 4 on the course requires a longer, accurate tee shot to set up a higher percentage approach. Avoid tree trouble to the left and right sides of the fairway. A large green is sloped from right to left and it is usually best to avoid being left or long of the green.
Hole Number 8
Par: 5HCP: 3
Blue: 515White: 505Gold: 401Red: 396
Avoid trouble down the left side of the fairway as well as a small creek that runs in front of the green and down the right side of the hole. With a green that is significantly sloped from back to front and left to right, avoid approach shots that are left or long of the green which result in a difficult chip shot.
Hole Number 9
Par: 4HCP: 11
Blue: 301White: 289Gold: 285Red: 280
Best played with a fairway tee shot from the right side of the fairway that gives the best angle into the green. Avoid missing your approach shot left or long into a tree backed green.
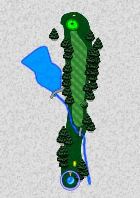
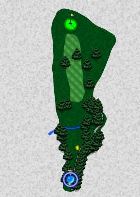
Hole Number 10
Par: 4HCP: 10
Blue: 298White: 291Gold: 289Red: 284
This hole is best played with a tee shot that rests in the flat lie area just past the 100 yard marker. The green is sloped from back to front so the ideal approach shot is below the flag location. A drive of 275+ yards that is needed to carry the water is a big risk/reward feature of the hole, but wind often plays a factor in this decision. A ball drop is conveniently located on the other side of the water.
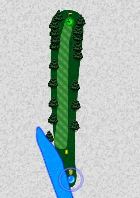
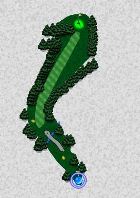
Hole number 11
Par: 5HCP: 4
Blue: 520White: 510Gold: 435Red: 430
This difficult par 5 requires an accurate tee shot that avoids the tree line on the left side of the fairway and water on the right side. The best approach angle into the green is from the right side of the fairway, but caution is needed to avoid the rough that tends to push the ball towards out of bounds. It is best to avoid missing to the left or right side of the green on the approach shot.

Hole Number 12
Par: 4HCP: 12
Blue: 315White: 305Gold: 300Red: 295
This short, downhill par 4 requires an accurate tee shot that avoids the tree lined left side of the fairway. Some trees provide trouble from the approach shot on the right side. The green slopes from left to right and towards the back. Missing the green long will usually require a difficult chip shot.
Hole Number 13
Par: 4HCP: 8
Blue: 330White: 320Gold: 315Red: 310
Accuracy is placed on the uphill tee shot to avoid trees lining the fairway. A blind uphill approach shot is usually required and it is best to avoid missing to the right of the green.
Hole Number 14
Par: 3HCP: 18
Blue: 140White: 125Gold: 115Red: 110
A delicate downhill tee shot is required to avoid trees to the left and right of the green. A soft approach area protects the front of the green. Avoid a much more difficult chip shot from behind the green.
Hole Number 15
Par: 4HCP: 6
Blue: 410White: 390Gold: 335Red: 330
Avoid tree trouble on the left side of the fairway but be cautious of the far right side of the fairway that tends to push the ball towards the out of bounds. Careful consideration is needed on the downhill approach shot into the green that slopes from left to right and towards the back.
Hole Number 16
Par: 4HCP: 12
Blue: 325White: 310Gold: 255Red: 250
This hole requires an accurate tee shot to avoid trouble short, left and right of the fairway. A few large trees may disrupt your approach shot into the green. Avoid approach shots that miss the green long.
Hole Number 17
Par: 5HCP: 2
Blue: 535White: 525Gold: 445Red: 435
An accurate and longer tee shot that favors the right side of the fairway sets up this hole. There is a big risk/reward of driving over or around the trees on the right side of the fairway that must avoid the out of bounds. Avoid the tree lined left side of the fairway to set up the best approach shot into the green. The green slopes from front to back so it is best to not be short on the approach shot. Chips from the left to right of the green can be difficult depending on the flag position.
Hole Number 18
Par: 3HCP: 16
Blue: 170White: 160Gold: 135Red: 130
An uphill hole that plays longer than the stated yardage. The green is narrow and protected by a steep hill on the front and back sides, leaving a more difficult chip from these positions.